Home » Articles » Forensic Geology Lesson
Forensic Geology Laboratory: The Sands of Crime
By Howard Schindler and Jacqueline Gnant
Republished from the Summer 2009 edition of The Forensic Teacher.
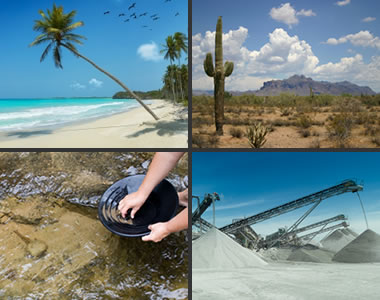
Sand is found in many different "environments." The color, composition and properties of the sand will be different for each environment. Sand from a tropical beach might be made up almost exclusively of sand-size shell and coral debris. Sand from a scrubby desert environment might have frosted grains and be contaminated with particles of plant debris. Sand from a stream might consist of rounded grains, and its compositiion will reflect the soils and bedrock from upstream locations in the drainage basin. Manufactured sand will be very different. It is made by crushing rocks and the particles will be very angular. Images copyright iStockphoto and clockwise from top left: Alberto Pomares, Vlynder, AdShooter, snokid.
A Lesson in Trace Evidence
Trace evidence can be a challenging unit to teach high school students with Early Onset Senioritis. The microscope work can be tedious and students' attention to detail wanes easily. However, I know that my students come to class thinking that dirt is dirt and sand is sand; they fully believe that there is little difference between samples or that telling the differences involves intricate analysis that is beyond their comprehension.
"Murder on the Beach" Laboratory
The Murder on the Beach lab is relatively easy to prepare, uses tests and data beyond microscope work, and includes a mystery for students to solve. In part one of the lab, the students review known samples of sand - those that were taken from the suspects. I usually give the students about 50 minutes for this part. Part two requires the students to analyze a sample of sand found on the victim and to identify which of the suspects committed the crime.
 |
The Forensic Teacher MagazineThis lesson on "The Sands of Crime" was published in the Summer, 2009 issue of The Forensic Teacher Magazine. Visit their website for more ideas about teaching forensic science. |
Collecting and Preparing Sand Samples
If you live near a beach, an initial sand sample is easy to obtain. The rest can come from just about any pet or aquarium store - several varieties are available for reptiles and fish. Most of these samples are going to be a relatively neutral pH, so I treat the samples ahead of time to give the students some measurable differences. I generally start with three or four very different samples, then make combinations to create more samples, giving me a total of seven different samples for the lab.
For the second part of the lab, I prepare enough samples so that every student gets his or her own victim sample to test. This way, students can work together to share observations, but everyone has to come up with his or her own final answer.
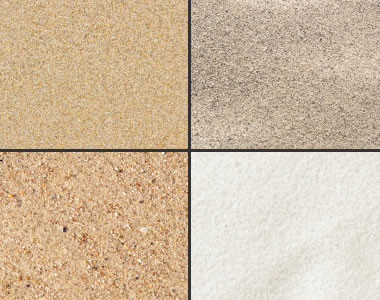
When students begin to examine sand, the first difference between samples that they might notice is color. Then without using a microscope they can make observations of texture, grain size, and grain shape. Under the microscope they will detect differences in mineral composition, the presence of organic materials, and the luster or diaphaneity of mineral materials. Images copyright iStockphoto and clockwise from top left: Rusm, Don Wilkie, Olena Pantiukh, Vivian Seefeld.
Prepare Once and Assign for Several Years
The preparation can be a bit time consuming, but I only have to do it once every few years, as students only use a small amount of the victim samples for testing. I use old 35 mm film canisters, which I've labeled with numbers one through 28. I fill each canister with different samples and create a master list of which sample is in which canister. Some of the "pure" samples are fairly obvious, visually, so I use mostly mixed samples for this portion.
Distributing Samples to Students
I always make sure to have all students complete part one before I give out samples for part two, just to ensure that students work off their own notes and not a direct side-by-side comparison. I find that students make more thorough, complete observations if they know the exemplars won't be available.
Store Everything in a Box for Next Year
One of the reasons I enjoy this lab is because it's only a lot of work the first time - after that I keep everything in a box and it's ready to go for the next year. The information the students need is all contained in the lab, so I can plan it for anywhere in the unit without worrying about time to introduce it or doing notes ahead of time. It's self-contained enough that they walk away with a lot of vocabulary that I never had to directly teach them.
Students Are Surprised by the Acid and UV Tests
|
This lab has been a hit with students, too. They don't expect sand to effervesce in acid, and when portions of some of the samples glow under UV light students respond with the requisite "ooh"s and "aah"s.
They're always more engaged when they have a mystery to solve, so I have no problems keeping them on task.
Most importantly, my students leave the lab knowing that dirt isn't just dirt and sand isn't just sand, and that both can be valuable pieces of evidence. This lab is a must-have in any trace evidence unit.
| More Geology Topics |
 |
Gold |
 |
Fossils |
 |
Landslides |
 |
Plate Tectonics |
 |
Topo Maps |
 |
Metals |
 |
Gifts That Rock |
 |
General Geology |

Find Other Topics on Geology.com:
|
| ||
|
| ||

|

| ||

|
|

